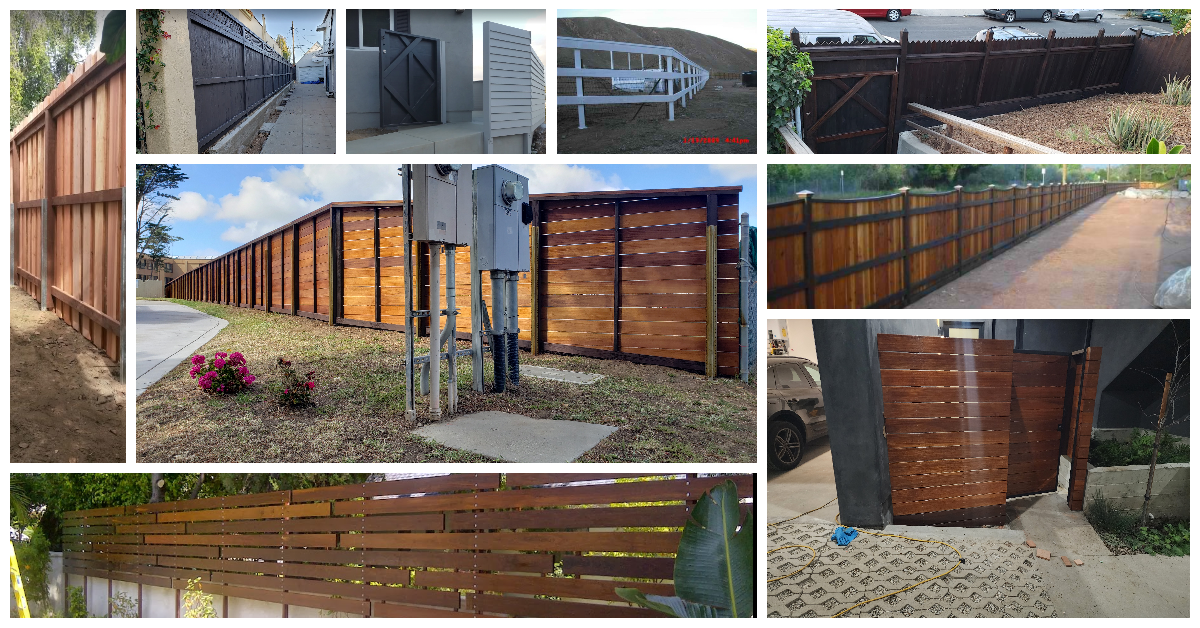
Some people call them wood fence toppers. I prefer calling it a wood fence extension atop a hollow concrete block wall as is the case in this case. Solid concrete walls are a little different, that will be a different article.
Custom Wood Fence Extension atop Concrete Block Wall (1 of 2), Burbank 91505, design, built & stained by WoodFenceExpert.com
The lazy, cheap, weak and inexperienced way is to lay a flat member like a 2×4 or a 4×4 down horizontally on the cap row and attach to the cap row only with either Hilti concrete nails or more often I see TapCon brand blue 1/4″, maybe 5/16″ or 3/8″ concrete screws. This is wrong because it’s only as strong as the mortar holding the cap row onto the wall below. It’s also wrong because the flat wood member lying upon and attached to the cap row will develop rot and attract termites, because it’s outside. And it’s wrong because it’s weak with no leverage strength built into it. Sure it’s how you build walls for a house, but that’s different because house walls have a waterproof skin to seal out moisture, rot and termites. It’s how you build walls for a house, but there are no other walls or a roof to attach to for strength, so it’s weak.
Custom Wood Fence Extension atop Concrete Block Wall (2 of 2), Burbank 91505, design, built & stained by WoodFenceExpert.com
Just like a “regular” wood fence, you need solid vertical wood posts to build from and upon. Carefully core drill holes in the concrete or brick cap row, right where you need them. This is determined by your post spacing, heavy duty “L” bracket position that will be fastened to each post, as well as positioned over a hollow vertical cavity in the wall-to pour fresh mixed concrete into, all the way to the top! Yep. Dropping a stick or two of 3/8″, maybe even 1/2″ rebar (depending on the specifics of the situation of course) into the cavity just before the concrete pour certainly will make it even stronger and better. And longer lasting of course, which is what we all want, right?
After your layout is all done, cap cores are drilled out, fill ’em up! Oh yeah, have your 1/2″ threaded rod pieces all ready to go, each with a washer and hex nut to keep them from sinking into that fresh concrete. Concrete should be a little wet for this, but not too much. Position your “L” brackets where they’re going to be, drop the threaded rod into the fresh concrete and let the concrete do its job (permanently grabbing that entire cavity of the wall and permanently grabbing the threaded rod). Of course there are other details like alignment, specific post spacing, threaded rod length, type of “L” bracket, etc. You have to keep an eye on every cavity after pouring and setting the hardware for concrete seepage and corresponding dropping from the top, do this as long as it takes, and top them off as necessary for an even and flat result with the top of the cap. Figure it out or call, text or email me to have me build it right. THIS article is just to point out the primary basic method to attach to the top of the wall correctly and securely.
Every situation is different. Therefore as the designer and builder it is necessary to design and build for the specific situation in each and every instance. Right? Right. The photo below shows it all done.
If you’re a DIY’er or a fellow builder researching how to build a wood fence extension on top of a hollow concrete block wall: You’re welcome! If you need this done for your property or estate just call, text or email me. 310-717-2000 is my cell.
Now I’m changing to a very different but important subject: Engine Oil, Fluids and Lubricants for Your Vehicle(s) and Equipment. I have found and my truck LOVES the best synthetic engine oil, fluids and lubricants available on the market. So, I had to get involved. Go to my other website so your vehicles and equipment can enjoy the benefits just like my truck does! The link is right below.
So, You’d like a dog proof new wood fence? No problem, we can build that. BUT, this really depends on the dog or dogs that you’re dealing with. A dog proof wood fence for a miniature Chihuahua is going to be different than a dog proof wood fence for a Great Dane or an Irish Wolfhound. Similarly it depends on the dog’s attitude and behavior. If it’s a psycho Pit Bull that’s the neighborhood night-time dog-fight champ trained to kill, that digs, claws and rams it’s way through obstacles until it bleeds, OR if it’s a tame and well-mannered Dachshund (wiener dog) that goes to the dog park twice a week, and is a favorite at the local doggie-daycare, these two dogs will require different dog proof wood fences. Obviously. THIS is the most important thing to consider.
Tiny dog? Then you need a tiny space at the bottom of your gates and fence, with small spacing in between the planks. Digging dog? It depends how much of an excavator he or she is. A little wire mesh buried 6″ in the ground in between the posts could be plenty. In a severe case you might need a 2′ deep concrete curb in between the posts. What about the soil type and condition? That’s a factor too. We once did a very nice horizontal wood fence and pedestrian entry gate for a concrete patio style front porch courtyard beside the garage, and stained it. But the dog was a bit of a beast, defending its home and earning its meals and treats. So we had to add a 3′ tall 3/4″ square wire mesh to the bottom part so it was too uncomfortable for the dog’s paws and toes for him to be clawing or upon the fence. And it worked perfectly. We put it on the bottom part of the matching wood pedestrian entry gate too.
So it really depends on the dog and the situation. Every situation is different. Details are everything, very important.
Pros and Cons of a dog proof wood fence? Is this an AI, computer generated question, OMG. The Pro is your dog is safe from escape. The Con is you have to pay for dog food and vet visits and clean up after your pet.
To get the right dog proof wood fence, it REALLY depends mainly on your dog or dogs. It’s got to be designed and built for THAT situation. We can do that, no problem. Call, text or email me for a quote!
Jamie Forbes from Redfin.com has put together an article titled How to Create a Dog-Proof Fence, where he has sampled and/or edited a few industry opinions on this topic including mine here from this article. Enjoy!
DIY (Do it Yourself) strong (no sag) wood pedestrian gate build? Okay let’s do one! I’ve been getting quite few requests for free instructions and/or plans for building, especially my gates but also my fences. Or rather how I would build their projects. I have accepted a very few rare customers on an on-call/retainer consulting basis for their projects. All their projects turned out excellent, I am happy about that. So let’s get into a real good, DIY (do it yourself) strong (no sag) wood pedestrian gate build. At the very end of this blog article, see something different (from me) that I’m recommending. Yes it’s excellent. Get (purchase) it through me if you would, that’d be great. If I get really good results from this article, then I will follow up with more and more to make this a big, juicy series. It will have tons of very useful information about exactly how I build what I build. That’s IF I get really good results (see what I’ll selling at the end)!
I built two of these, matching gates, one for each side near the front of the house. We’ll zero-in on the slightly wider space that was approx. 5′ wide from house wall to side wood fence. The old, previous wood gates were absolute garbage, as is usually the case. I removed the old deteriorated gates.
As I describe and show the gate-posts, they’re for both matching gates. As I describe the gate, I’ll be focusing on the one, slightly wider space gate, for this DIY (do it yourself) strong (no sag) wood pedestrian gate build.
First we need two posts in the ground, a hinge post (which does more work and must be the stronger of the two) and a latch post. The hole I dug for the hinge post was about 3′ deep, probably a few inches more. Yes it’s necessary if you want it to last. The latch post was about 2.5′ deep, give or take an inch. Make sure the holes DON’T get smaller and skinnier as they get deeper. It should be approx 12″ in diameter at the top, AND at the bottom, all the way down. Some guys say it should have a bell-shaped profile, being wider at the bottom. In some situations like on a hill, maybe. It depends on the situation, every situation is different. Everybody has an opinion. In this situation (this jobsite build) it was not necessary, for this DIY (do it yourself) strong (no sag) wood pedestrian gate build. And just to make sure everything is right, any Amazon links that I place in this article have the building goodies, tools, materials, etc., priced AT or BELOW big box store prices if they’re even available. UNLESS I tell you otherwise right before that link.
I used a regular post-hole digger (two-stick, hinged scooper), a steel breaker/digging bar (it’s actually called a “San Angelo Digging Bar”) for loosening the dirt as necessary. The wedge end is sharp too, great for chopping roots in the hole. I also use a Makita mid-sized electric breaker/demohammer/jackhammer. Had mine for 8 years, finally brought it in for its first service for about $180.00 like 2 years ago. Still running strong whenever I need it. You also need a 1-1/8 inch bit for the jackhammer. I have always used the chisel bit with the greatest success, I’ve tried the others. All these to dig the holes, get the old concrete broken and removed, get through tough clay or rock or sandstone in the earth. Oh? You want to see my electric jackhammer? Here it is today, still going strong. Second chisel bit nearing the end. Lots and lots and lots of use!
The latch post is a pressure treated Douglas Fir (PTDF) 4×4 with a 2x2x18GA galvanized square steel tube bolted together as a single piece. Luckily for the customer I had a 12-footer left over from a larger project, so I cut it into two 6-footers, one for each latch post. The steel end goes into the hole to be buried with fresh concrete. Is this really necessary? Well yes it is. That 4×4 latch post WILL warp over time, maybe just a little, maybe more, it is very difficult to predict that. The steel 2×2 bolted to it helps keep it from warping over the years and weather. Plus it makes it even stronger to withstand the gate closing and slamming against it over the years.
I laid them across on top of my saw-horses. I clamped them together after I lined them up just perfect. I measured and marked where to drill. I drilled through the steel 2×2 first so the steel was on top (having steel-drilling drill bits makes it easy). Then I switched drill bits to a longer wood drill bit to finish the hole all-the-way-through the 4×4. I reamed it with two or three extra strokes to make sure the hole was clean before removing the bit. Always keeping the bit spinning full speed (just like sawing with a saw blade), just when you begin, all the way through, and back out into the air when it’s done, THEN release the trigger and let the drill stop spinning. For these I used 6″x3/8″ galvanized carriage bolts with a matching washer and nut. After drilling the hole I pounded the carriage into the hole from underneath with my framing hammer, then got out the right size socket plus a ratchet, put the washer & nut on, then tightened away until the carriage head SUNK into the wood 4×4, since it (the 4×4) will shrink from drying and it’s supposed to last for a long time. After a post is done, off come the clamps. These are awesome, strong and long lasting latch posts for this project, this DIY (do it yourself) strong (no sag) wood pedestrian gate build.
The hinge post(s) for this DIY (do it yourself) strong (no sag) wood pedestrian gate build, will each be a 3″x3″x1/4″ thick square steel tube buried in fresh concrete, THEN sandwiched (and bolted together) by a 4×4 wood post on each side. The 4×4 wood posts float above the ground approx. 1″.
Find your local industrial or ornamental steel supplier for these babies. Normally available in 20′ lengths, I had them cut my 20-footer in half, into two 10-footers. They’re a little heavy, and dirty.
I laid them out on my saw-horses. Then wipe them down really good with a microfiber rag soaked with either paint thinner or Goof-Off like I used here. The Goof Off is a better, stronger solvent. You save at least $10 by purchasing it from Slow Depot. But if going there isn’t the choice you want, then there’s the link for that right below. And there’s a great deal on microfiber rags too. I don’t care what colors they come in since I use them for rags for work or detailing my truck. I got these wood Burro sawhorses from either Slow Depot or Slow’s, it’s been a long while and I go so often to both mainly for lumber. They’re great, last a long time, but cumbersome and bulky for storage and transport. I didn’t find anything online that I like. If you want sawhorses, please find the ones that you prefer. We’re going to paint these with the correct paint for this application, so they last a long time. So we want that paint to stick and stay for a very long time. As you can see, this project, this DIY (do it yourself) strong (no sag) wood pedestrian gate build is getting serious. But hey, it’s supposed to last for a very long time.
There’s both the painting tools and the paint that I used, in the photo above. Here’s that primer/paint to protect the steel that I use. And the 4 inch weenie roller kit gets it done the fastest and easiest. Just make sure you mix that paint VERY good before you use it. First I get the three top sides with a good, single coat. Set them out in the sun to let them dry for a couple or a few hours. Then when they’re dry, carefully flip ’em to paint the last side. Carefully to not accidentally scrape any paint off the freshly painted sides. It’s an excellent oil-based (petroleum solvent based) paint (actually primer), so you can leave it, or paint over it with another color to match the color scheme of your residence and estate as you see fit. You can always touch them up if necessary with a small brush after they’re in the concrete.
Now let’s get into the holes, the concrete pour, lining up and leveling/plumbing {vertically level (using a level usually) is called “plumb” in construction lingo} up them posts for this DIY (do it yourself) strong (no sag) wood pedestrian gate build. First, obviously make sure the holes line up with how you want the gate to be positioned. In my case it was a perfect 90 degrees to the house (square to the house, perpendicular to the house wall, windows are normally parallel with the house wall). To save time first get the posts done to the point of allowing the paint to dry. While the paint is drying you can demo the old gate if necessary and dig the holes.
This jobsite situation demands the gate open inward, away from the house wall (so it doesn’t bang against the house from the maid, or the gardeners every week). You can swing your gate any way you want, it’s YOUR gate and YOUR house, right? I didn’t take any photos of the concrete pour so I’ll do my best here. If a post is really close to the house look out for the gas and water supply lines into the building. The latch post is so close I had to skim off a little bit off the protruding concrete foundation underneath to have enough fresh concrete encircle the entire post (very important) all the way down the entire hole. For that you can chip it away with the electric breaker/jackhammer, which I did and do usually. You can also get out the angle grinder with a concrete blade and slice away, and follow that with the jackhammer as necessary. Dry concrete cutting makes quite a lot of concrete dust so beware. I still smoke cigarettes as of this writing so it does not really bother me, I hold my breath and/or try to aim the dust-stream away if possible. My nose gets full of dust so have to evacuate the wet nasal filters with a couple of good blows into a paper towel or blue shop paper towel (always carry a roll in my truck).
For this DIY (do it yourself) strong (no sag) wood pedestrian gate build, or any gate build, lining up and leveling/plumbing-up the posts during the concrete pour JUST RIGHT is very important. I can’t overstate the importance of this. I did this one by myself, but I’ve built quite a few of these. Depending on your experience it’s probably best to have one or two people helping you. Since I didn’t take photos of this part I’m improvising here. Skipping ahead with a photo to see how the post alignment should be, making it easier to explain.
To get this just right, lay a 2×4 down on the ground across the space. Position it IN FRONT of the posts so it will touch THE FRONT of the posts as you level/plumb them up and pour the fresh concrete. Also 4000 PSI ready mix concrete is what most people use for this and fences, it’s on everybody’s shelves, 60# bags. Here in Los Angeles the Slow’s home improvement stores also have a 4500 PSI concrete on their shelves (not really on the shelf, on pallets in the store in the concrete isle actually. I use the 4500 PSI concrete since it has more Portland Cement in the concrete mix and therefore is stronger @ 4500 PSI (pounds per square inch), which is it’s strength rating typically after 30 days of curing time after the pour. 60# bags work best since you can mix one in 1 minute using a strong 5-gallon plastic bucket, a very heavy duty DeWalt Electric Drill that I’ve been using forever, for years as a mixer, with an egg-beater style mixer about 30″ long, they last forever, I’ve gone through four or five during the last 14 years. They work the best and last the longest of anything out there available for this application/use. I put the egg beater mixer in the large electric drill and it’s fast!! I’ve mixed concrete so many ways, this is the fastest and easiest by far. Only thing you (the guy mixing) probably needs to put one foot on the top of the bucket to keep it from spinning, to hold it still while mixing up the concrete. You want to see my concrete mixer? Sure no prob. Here it is today. Lots and lots and lots of use, but still going strong. Haven’t bothered to clean off the egg beater as you can see. I have used this to mix hundreds of bags of concrete.
Lay a full concrete bag on top of the 2×4 once you have the position and alignment perfect, and then don’t touch it. This keeps it from moving around while you’re leveling the posts and pouring. Do one post first, this can take several minutes depending on your strength and experience. Without touching the 2×4, get the post exactly plumb/level where you want it, eyeball it 1/8″ away from the 2×4. Then hold that post firmly in position by applying pressure directly downward, with both hands, with one hand also holding the level against it to allow you to monitor and maintain level/plumb during all this. Tell your guys “ready”. Then they use a garden hose with a fast squeeze-pistol nozzle to put about a gallon of water in the bucket. While one guy is holding the mixer with the giant egg-beater in the water, the other guy dumps that whole bag right into the bucket. As soon as the dry concrete starts pouring, then the mixer guys starts mixing full-trigger if it’s a variable speed. You say “dump it”. Then you say “spin it”. The dumper makes sure the bag is completely empty, then quickly toss it aside for clean up a little later. The mixer makes sure to mix ALL of the concrete perfectly, if it’s too dry the dumper (and you) are watching and the dumper shoots a little more water into the bucket. If the dumper isn’t looking you say “water”. When there’s enough water added to the bucket (you need to pay close attention) you say “stop water”. Make sure the mixer doesn’t leave any dry concrete on the sides or bottom of the bucket for each bag, the mixing should be fast and perfect. When it’s all, completely mixed then you say “dump it”. Hold that post downward with strength so when the HEAVY and fresh concrete hits the bottom of the hole and then pushes against the post, the post DOES NOT MOVE. Then repeat with the next 60# bag of concrete. Fill up the hole only to the top, just below the 2×4 guide. Then do the other hole the exact same way. The steel 3×3 post is very heavy so it might take longer to get into perfect position, level/plumb and alignment with the 2×4 guide (don’t touch it, eyeball 1/8″ away). Same deal, fill up the other hole, without bumping into the first post. Now remove the guide, kick it away. Level those posts perfectly using your 4′ level, or 2′ level will work in a pinch. Jiggle the post a little as you level/plumb it to vibrate the wet concrete to help it settle and encourage any air bubbles to rise to the surface. Then fill up the remaining amount for each hole. Then have a thick mix ready for the cakes. The cake is the top part of the concrete, it rises above the ground by about 1″. It is sloped AWAY from the post to shed water and moisture to inhibit rot and infestation of wood posts and rust of steel posts. Trowel it nice with a little rectangular 5″ trowel, wet on top with NO air spaces between the post and the concrete at the very top edge. Looking at the photo above you can see the shape of the cakes. This DIY (do it yourself) strong (no sag) wood pedestrian gate build is going to be excellent. The concrete is wet and heavy enough to hold the posts in perfect position until you return to build upon them, in a day or two depending on time of pour, weather. Before you leave level/plumb them again with the level, just make sure they’re right before you walk away.
We’re back so let’s get to work on this DIY (do it yourself) strong (no sag) wood pedestrian gate build. This was in a little bit of a fancy neighborhood that also had a problem with prowlers, so we’re going 7′ tall with these gates. I’ve got two 8-foot 4x4s clamped sandwich style on the steel tube post. They’re about 1/4″ off the concrete cake, laid a carpenters pencil down there first for each post to rest upon. Eyeball them into as perfect level and alignment as possible and clamp them but not too much. Then get picky with your level and make them perfect, adjusting them by tapping them with your framer (framing hammer) whichever direction they need to go. One tap at the top, oh too much, half tap back. Get them both just exactly level/plumb, even with each other, and with about 1/4″ of space above the steel (in front of the steel), front of house front.
Once you get them perfect clamp them down hard while making sure they do not move as you do that. Measure and mark where you want your bolts. You need a good 1/2″ diameter x 12″ long steel drilling drill bit. And a bit of muscle. A good drill bit like this is at least $50 or $60. Then drill your holes all the way through the first 4×4, the first side of the steel tube, the second wall of the steel tube, then the other 4×4. Pull your bit out every 15 seconds of drilling into the steel to either spray it with WD40 or drip several drops of engine oil on the bit, with the bit sloped slightly downward making sure the tip gets wet. The tip is doing most of the work. This will help the drill bit last longer. After you got one done, then pound your 1/2″x12″ long carriage bolt through. Put the washer on, then the nut and tighten it down hard, to bury the head of the carriage bolt.
See how that cake slopes up to the post? See how it has a perfectly sealed edge against the post at the top of the cake? Awesome. I like to use an open end wrench to tighten the nuts and sink the carriage bolt heads, even though I’m using the box end of my 3/4″ wrench in the photo right above. Now to make the steel posts even stronger and even more long lasting. We’re going to fill them all the way up with fresh concrete. It will also keep them from rusting inside-out from years of dew and rainwater. Get a folding 5′ or 6′ ladder for the hinge post. Get a funnel with at least a 1.5″ diameter exit hole. Mix another 60# bag but a little bit on the wet side. Get another bucket, a 1-gallon or 2-gallon bucket for easy pouring. After mixing in the 5-gallon bucket, pour some into the smaller bucket. Then use THAT bucket plus the funnel to fill up the square steel tube. Make sure your mix is not too wet, but still wet and runny enough to not clog as it pours past the bolts, especially on the latch post. Fill them both up all the way with that fresh concrete. If you want an even stronger hinge post, drop a 10′ long rebar strand or two, or three, or four down inside just before you pour, 3/8″ diameter at least. When I drop in my rebar I usually do two, depending on the job, I might do none, or I might do four. I make sure one goes on one side of the bolts, and the other goes on THE OTHER side of the bolts. Then fill ‘er up.
Yeah coffee and cigarettes, the sign of a good builder. That’s what all that grey slop mess is. It wipes right off with a clean, water-soaked microfiber rag. The concrete will settle, a tiny, tiny amount of water will filter out through both the bottom and/or the drilled holes. Every hour come back and top off the steel tube posts as necessary, having the concrete level with the top. Don’t worry, clean up is fast and easy tomorrow when it’s all dry. Looking forward to having this DIY (do it yourself) strong (no sag) wood pedestrian gate build on your property yet?
DeWalt reciprocating saw (sawzall), couple hundred-foot power, couple of air hoses for the nail gun. The reciprocating saw is extremely helpful cutting off the posts once I establish my final top line. Especially the latch post so close to the house, right?
Drill bits, angle grinder with a steel cut-off disc on it, concrete blade, more cut-off discs and sanding discs in my yellow “grinder bag”. Tailgate office ain’t that pretty but it works great! So let’s build the gate frame next. It’s based on the posts, which should be just about perfect, if not perfect. During building, construction, the more perfect a step is done, the easier it is to make/build the next step perfect. Because each step is “based upon”, built upon, fastened to, attached to, or measured & spaced from the immediately previous step. Determine the final height of the gate, NOT off the ground, but from the bottom of the gate to the top of the gate. The gate needs swinging clearance above the ground, to clear the cakes, any old tree stumps, maybe an up-slope. Determine what the height of the gate is going to be. In this case (it’s been a while since I took these photos) I think it was 81 inches, maybe 82, top of the gate (where I want it) to the bottom of the gate. Then take three careful and precise measurements within that space, from latch post to wood hinge post, high, middle and low. Those three measurements should all be within 1/8″ or less. If you’re good they’ll all be within 1/16″. This gate opening was almost 40″ wide, don’t remember exactly. But to show how to DIY, let’s go with 82″ tall and 39″ wide opening between the posts. Okay, 82″ minus 3″ (two 2x4s flat @ 1.5″ each) equals 3″. Okay, for this DIY (do it yourself) strong (no sag) wood pedestrian gate build, we need two 2x4s and one 4×4 all cut at exactly 79″, perfectly squarely-especially the 4×4. A chop/mitre saw is preferred with a good table set-up. You can wing it with a circular saw like I did on this one if you’re really good with a lot of experience. These numbers need to be within 1/32″, half a 16th, to make it easiest to pull off. Now the two width 2x4s, top and bottom pieces. 39″ opening width, so half inch for the hinge side, let’s do a quarter for the latch side since it’s a slightly wide pedestrian gate (narrower spaces and gates like 2′, 2&1/2″ swing differently and so require a little more space for clearance on the latch side to not rub the latch post). 39″ minus 3/4″ therefore, equals 38&1/4″, two 2x4s please @ 38&1/4″.
After those pieces are cut and they’re just about perfect, lay them out on as perfect and flat a surface as you can find, garage floor, flat driveway. Lay them out in exactly the shape they’re going to be in, without the second, 79″-long 2×4, leave that one aside for now. We’re just doing the outer, perimeter box of the gate frame first. I spaced and forgot to take photos of screwing the frame together on the ground, UGH! Here you can see it, to see how the frame members should be positioned and oriented with each other.
You can also see the 2×4 I put on top of the hinge side, running over to and fastened to a 2×4 I had fastened to the old wood fence there. Yes I know it’s a mess with the dried-up concrete droolings. I’ll get to that later with a water-soaked microfiber rag. I didn’t take a photo of them laid out, here’s how you do it. One 4×4, one tall 2×4 ONLY (for now), two width 2x4s, in exactly their finished position but laying on the ground as a big rectangle gate frame. Screw them together using 3.5″ coated exterior deck screws, star drive, three screws at each corner (T-25 size, you’re going to need a few of these size bit-drivers for your cordless drill). You can see I’ve driven the screws below the surface of the wood. Fresh pressure treated is very forgiving, you can just screw them in. Make your cuts so you do not have any knots at your screwing locations. Kiln dried or semi dried lumber splits more easily so you may need to pre-drill your screwing holes with a counter-sink bit first.
AGAIN I will state, just to make sure everything is right, any Amazon links that I place in this article have the building goodies, tools, materials, etc., priced AT or BELOW big box store prices if they’re even available. UNLESS I state otherwise just before that link.
Next put that other tall 2×4 into position so it’s flush/even with the front edge of the frame. Gently hammer it into place. Clamp it in place and then screw it together using those 3&1/2″ star drive deck screws. From the outside, side 2×4, into the second 2×4. A couple of 4 inch x 5/16″ GRK T-30 size star drive lag screws equidistant from the top, and bottom (say like 10 inches) really hold it together. Bury the heads just flush with the surface as you drive them into the wood.
Still working on this! I’ll finish it as soon as I can. Sorry for the delay.
Here’s a new surprise, something completely different but EXCELLENT! Here are my FAVORITE stores for kitchen cookware, gadgets, and other similar high quality tools for the kitchen. You can bring the wife for this trip, uh, oops. It’s 2022 I forgot. You can bring the hubbs, um, either way these are my favorite stores for shopping for the kitchen.
CLICK to go to the Lodge Cast Iron Store on Amazon
CLICK to go to the Fullstar Kitchen Inovation Store on Amazon
CLICK to go to the Misen Better Cooking Tools Store on Amazon
CLICK to go to the Bonsenkitchen Store on Amazon
CLICK to go to the HexClad Hybrid Cookware Store on Amazon
CLICK to go to the DASH Kitchen Goodies Store on Amazon
CLICK to go to the de Buyer Cookware Store on Amazon
CLICK to go to the Hamilton Beach Store on Amazon
CLICK to go to the Zyliss Kitchen Gadgets Cookware and more Store on Amazon
CLICK to go to the finedine Kitchen Cookware and more Store on Amazon
We recently completed a very nice custom horizontal wood fence and matching door project here in Los Angeles, over in the Palisades. They needed it to be two sided to match the other similarly built horizontal wood fences in their condominium/townhouse complex. It was for privacy for their back yard/patio area, from the common area. It had to be very nice, strong and beautiful.
They wanted a custom Ipe horizontal wood fence, two-sided with staggered elevation horizontal planks for privacy. No problem except for one thing, the budget. Not a problem, why not a custom Mahogany horizontal wood fence instead? Currently (the prices of different woods fluctuate and over time usually tend to increase with inflation like everything else) Mahogany is less expensive than Ipe. Mahogany is strong and beautiful like Ipe and even more famous. But nowadays Ipe horizontal wood fences are a rage and a fad. I say why not a Mahogany horizontal wood fence? Mahogany is just as beautiful, some people say it looks better than Ipe! Mahogany is also an extremely durable hardwood, plus it’s more famous (well known would be a better term here in this context, but since this is Hollywood I’m using the term famous).
You can see the weathered Ipe walking deck wood planks. Unfortunately the builder did a poor job inappropriately framing below for those planks, gluing thin 1×2 Ipe wood strips to the concrete below, then using 1&5/8″ screws. Welcome to LA, short cuts and crappy construction examples are easy to find in this city.
They only wanted the inside stained so we obliged. It’s a very, very nice condominium/townhouse complex in the Palisades here in LA, so they of course chose us to build their custom Mahogany horizontal wood fence and matching door project to build it right. So we did.
The stain is still wet, we’re in the clean-up phase so I decided to snap a few quick photos before I forget, trying to keep as much of the tools and mess as possible out of the frames while still showing off our recent build.
“Oh! Oh! Ipe horizontal wood fence! Yeah, that’s what I want! Baby, we HAVE to get an Ipe horizontal wood fence! The Kardashians might come over!” Uh, really? Why not a Mahogany horizontal wood fence? Lookie here, ain’t it pretty? Make them neighbors, guests and friends jealous ’cause your Mahogany horizontal wood fence looks even better than their Ipe horizontal wood fence!! And when they inquire “Oh, is that Ipe?”, calmly and proudly you answer “No it’s actually Mahogany”. Continuing you elaborate a little “Yeah, I just like the grain characteristics of the Mahogany better than Ipe. To me it’s a finer wood”.
So while everybody else is making all that noise about their new Ipe horizontal wood fence, just call me and we’ll sneak over and build you a finer, better looking Mahogany horizontal wood fence! Then see who’s horizontal wood fence stands more proudly!
Either way, we’ll build you an excellent horizontal wood fence, Ipe or Mahogany. Just give me a call, text or email.
Visit the main website at WoodFenceExpert.com.
Here’s a new surprise, something completely different but EXCELLENT! Here are my FAVORITE stores for kitchen cookware, gadgets, and other similar high quality tools for the kitchen. You can bring the wife for this trip, uh, oops. It’s 2022 I forgot. You can bring the hubbs, um, either way these are my favorite stores for shopping for the kitchen. CLICK to go to the Lodge Cast Iron Store on Amazon CLICK to go to the Fullstar Kitchen Inovation Store on Amazon CLICK to go to the Misen Better Cooking Tools Store on Amazon CLICK to go to the Bonsenkitchen Store on Amazon CLICK to go to the HexClad Hybrid Cookware Store on Amazon CLICK to go to the DASH Kitchen Goodies Store on Amazon CLICK to go to the de Buyer Cookware Store on Amazon CLICK to go to the Hamilton Beach Store on Amazon CLICK to go to the Zyliss Kitchen Gadgets Cookware and more Store on Amazon CLICK to go to the finedine Kitchen Cookware and more Store on AmazonHere are a few highlights of modern horizontal wood fences that we’ve built in the Los Angeles area over the years. Even though this is composed of highlights I’ve made it as thorough, informative and interesting as possible. Please enjoy!
Even though we built and stained this elevated/floating, semi-privacy horizontal Ipe wood fence back in 2013, it’s still one of the nicest, most elegant and artistic wood fences that we have ever built in the Los Angeles area!
Custom Evelated/Floating 1×6 Ipe Horizontal Wood Semi-privacy Fence
I still remember the morning I first met with the owner over coffee to measure out and discuss this project. He found a photo of something previously built on the Internet that was similar but not quite right and appropriate for his situation. So we talked about how the design should be modified to their liking. Here is that photo.
Sample Ipe Horizontal Wood Fence
We concluded with square steel tube posts (that finally got covered with matching Ipe wood strips), uniform length end-to-end spaces yet evenly and irregularly distributed in the body of the wood fence, approximately the same even spacing in between the horizontal wood planks, the same carriage bolt fasteners for strength and longevity, and the overall top height, length and bottom edge height dimensions. Our meeting and discussion was easy and only consumed about 30 or 40 minutes.
I’ve had other customers that have had special landscape designers and architects draw up designs to be built. Sometimes that’s a little frustrating-just because somebody drew it or used a computer to draw it doesn’t mean it’s an appropriate, or good design: function-wise (structurally) or form-wise (design and appearance). Yet these fancy designers still command a fee! I say let’s meet over coffee and figure out the details, it’s not really difficult or complicated, plus it’s fun to create something out of nothing.
I still like my (our) custom Ipe horizontal wood fence better. But I do admit the original is very nice. Here’s a look from the other end. Also the one section with no end-to-end spaces is the exact center of the fence! It went up slowly and carefully and came out fantabulous!
Custom Evelated/Floating 1×6 Ipe Horizontal Wood Semi-privacy Fence #2
We built and stained this modern horizontal wood fence on the west side of the Los Angeles area. This customer, they had procured a landscape architect beforehand. In this particular case the parameters from the landscape architect were easy to follow, and when I finally met him at the end of the project he turned out to be really cool. It was busy so I didn’t make it back to photograph our build until almost 2 years later, so all the landscaping had been done immediately following our custom, modern horizontal front yard wood fence with matching pedestrian gate project. The bushes had been planted and had grown. It was an empty front yard with a dying lawn when we built this fence. It’s all beautiful now! And it was a hot day in LA when I stopped by to snap this photo.
Front Yard Modern Horizontal Wood Fence in Los Angeles, Built and stained by WoodFenceExpert.com
The sun was a huge factor with this modern horizontal wood fence with matching pedestrian gates and matching semi-privacy sun-shades project over in a fancy neighborhood on the east side of Los Angeles. It wasn’t quite the peak of summer when we built it, but I can tell you the front of the house gets pounded by the sun for most of the day. Everything was a tear-down followed by our build. The previous sun-shades were 2×2 verticals, the previous side fences & gates were regular vertical dog ear.
Modern Horizontal Wood Fence and Gates with matching Semi-privacy Sun-shades 1 of 3, Built and stained by WoodFenceExpert.com
Meeting with the owner was pleasant as it always is. He already knew almost exactly what he wanted. We measured it out together so I could find out exactly the precise dimensions that he wanted. The new semi-privacy sun-shades are just slightly larger than the previous ones (which were deteriorated and ready for replacement!), so he knew how much of the LA sun he needed to block.
Modern Horizontal Wood Fence and Gates with matching Semi-privacy Sun-shades 2 of 3, Built and stained by WoodFenceExpert.com
Those 1×2 horizontals are elegant, I love how they look and I love building with them. But staining them is very tedious, OMG! Patience is required for the staining of 1×2 horizontals. Since building and staining this project I have only noticed similar wood semi-privacy sun-shades once or twice during my travels to and from our job-sites.
Modern Horizontal Wood Fence and Gates with matching Semi-privacy Sun-shades 3 of 3, Built and stained by WoodFenceExpert.com
A similar but smaller project we built (and painted this time) a few years earlier had an interesting aspect. Believe it or not, according to the owner, this is Feng Shui. The owner was incredibly specific about all the dimensions, the quantity and sets of the different sized horizontal planks, it was a cool and interesting build and experience. 1x4s and 1x2s, it’s a beautiful pattern. 1x6s on the back side without any spacing so they could enjoy the aesthetic of the spaced planks in front as well as the privacy of the structure! Very Zen as well. And a true modern horizontal wood fence in the Los Angeles area, North Hollywood to be precise. The wetness of the paint is still visible in some places since I took this one right after we finished!
Feng Shui Horizontal Front Porch Wood Privacy Fence/Wall, Built and painted by WoodFenceExpert.com
Once an interior designer wanted our 1×2 horizontals for one of his customers! It was a change of pace working indoors. This was on the west side, over near Mar Vista. I have to say his idea materialized in an excellent way. A small project sure, but for us very unique and interesting and fun to help create. It turned out very, very nice! After we were done and gone, and the remainder of his work was done, here is the finished product in that context.
1×2 Horizontal Wall Facade in Living Room Surrounding Fireplace, Built by WoodFenceExpert.com
Another time I was called upon to help a restaurant with its outdoor patio situation. After dark, cars in the adjacent parking lot would shine their headlights right into the faces of customers eating in the outdoor patio of the restaurant. Plus there is a row of parking spaces where the cars’ headlights would be just a few feet away from the tables at that edge of the patio, very uncomfortable for customers there whether daytime or night-time.
2-sided-modern-horizontal-wood-fence-for-restaurant-patio-area-1-of-2-built-and-stained-by-woodfenceexpert-com
It was really a pleasure building and staining this project. Actually it’s 99.9% always a pleasure to build our projects for our customers. But with this particular modern horizontal wood fence project in the Los Angeles area, we were able to experience yet another unique and satisfying gratification. That is the excellent food that is always made and served here! This restaurant in West Hollywood really knows how to make excellent food. I know what you’re thinking, “Oh, hungry construction guys are easy to please with almost any food”. Well there is truth to that, but I LOVE their food, their Three Musketeers dish is my favorite. Here’s an outside shot which some of you will recognize.
2-sided-modern-horizontal-wood-fence-for-restaurant-patio-area-2-of-2-built-and-stained-by-woodfenceexpert-com
A really fancy couple way up in the Hollywood Hills wanted to make their ugly pool equipment disappear. A modern horizontal wood fence with a matching double-swinger pedestrian gate pool equipment enclosure built and stained by us was the answer. Their pool patio was incredible, with awesome views overlooking Los Angeles.
modern horizontal wood fence with a matching double-swinger pedestrian gate pool equipment enclosure, #1, built and stained by WoodFenceExpert.com
Now you see it.
modern horizontal wood fence with a matching double-swinger pedestrian gate pool equipment enclosure, #2, built and stained by WoodFenceExpert.com
Now you don’t.
modern horizontal wood fence with a matching double-swinger pedestrian gate pool equipment enclosure, #3, built and stained by WoodFenceExpert.com
This customer has a very short back yard, plus, a very short concrete block wall separating their back yard from their neighbor’s. And their neighbor has an equally short back yard. With only the short block wall, there is zero privacy and it’s too uncomfortably close for each neighbor, easily looking into the other’s yard and house. So they removed a large hedge of bushes from along the wall to create more space in their small backyard (I know, here in LA some homes have NO backyard, some have small back yards, and some have larger backyards.).
1×6 Ipe Elevated/Floating Horizontal Wood Semi-privacy Fence 1 of 2, Built and stained by WoodFenceExpert.com
It came out fantabulous! Even the neighbor’s side looks good. Just the right amount of privacy. And more usable space in the backyard. Often times these concrete block walls cannot be trusted to support a wood fence extension atop them. I’ve seem some pretty poorly built and deteriorating concrete block walls here in LA. These steel posts buried in concrete not only reinforce the foundation of the wall, but in the undesirable event of a large quake, the odds are that the wall will crack apart, bounce off the steel posts and either fall down or into the neighbor’s yard. And the odds are that the floating wood fence will still be standing, depending on how severe a quake is of course. One more shot of this modern horizontal Ipe wood elevated/floating wood fence, that we built in Culver City.
1×6 Ipe Elevated/Floating Horizontal Wood Semi-privacy Fence 2 of 2, Built and stained by WoodFenceExpert.com
Venice! Home and showplace of modern horizontal wood fences in the Los Angeles area.
Modern Horizontal Wood Fence + Gates & Matching Utility Enclosure, Venice, #1, Built and Painted by WoodFenceExpert.com
This was a fun and exciting build! The owner had a general whose specialty was time. I met with them both originally, very nice. But that general had all the trades going at the same time during this complete inside-and-out remodel, and was on-site cracking the whip and keeping the peace! It was fine to me. But I remember a couple of guys that lacked the flexibility and were uncomfortable at this very busy job-site!
Modern Horizontal Wood Fence + Gates & Matching Utility Enclosure, Venice, #2, Built and Painted by WoodFenceExpert.com
I actually enjoyed the change of pace. I did not care for the parking availability there in that crowded district of LA. But hey, it ain’t Texas, it’s LA and some parts of LA are very small and crowded. If it were Texas I’d git myself a nice big lifted dually pick-’em-up-truck!
Modern Horizontal Wood Fence + Gates & Matching Utility Enclosure, Venice, #3, Built and Painted by WoodFenceExpert.com
Privacy was important here so the owner went with the overlapping modern horizontal design wood perimeter fence for the property. There’s the utility enclosure with the double-swinger pedestrian access gate next to the back house, with the garage in the background.
Modern Horizontal Wood Fence + Gates & Matching Utility Enclosure, Venice, #4, Built and Painted by WoodFenceExpert.com
It definitely came out fantabulous! The beach is just 2 blocks away.
Modern Horizontal Wood Fence + Gates & Matching Utility Enclosure, Venice, #5, Built and Painted by WoodFenceExpert.com
Some of these homes up in the hills of LA have such small front yards! Like this one. Back yards are steep hills sloping away from the houses. Tight, narrow streets, so big dually pick-’em-up-trucks would have to squeeze through and rub bushes. Ahhh, the pleasure of driving around Los Angeles.
Modern Horizontal Front Yard Wood Fence + Matching Pedestrian Gates, Los Angeles 90026, 1 of 3, Built by WoodFenceExpert.com
Everybody including all the neighbors loved it, another fantabulous build! These photos were taken right as we’re finishing up the last day, doing clean-up and packing up all the tools. A less expensive modern horizontal wood fence up in the hills of LA, with a special type of rough Redwood.
Modern Horizontal Front Yard Wood Fence + Matching Pedestrian Gates, Los Angeles 90026, 2 of 3, Built by WoodFenceExpert.com
The owners stained it themselves to save a few bucks. They did go with my recommendation on which specific high quality exterior oil base stain & sealer to use after we built it. They used the clear/”natural” color of that product group, I have driven by since and it really looks nice. I might swing by another time for that photo and toss it in around here, but everything (especially driving here in LA) consumes time.
Modern Horizontal Front Yard Wood Fence + Matching Pedestrian Gates, Los Angeles 90026, 3 of 3, Built by WoodFenceExpert.com
These are just a few highlights of modern horizontal wood fences that we’ve built here in the Los Angeles area. Go to the Photos page of the main website to see many more by clicking HERE.
This little project was way up in the hills of the suburbs. Again it came out excellent. The soil was extremely rocky, digging the post holes seemed to take forever. Previously they had thin, hollow square steel tube fencing and gates that were rusting through and also too short to keep the bears out.
Custom Horizontal Wood Fence + Matching Pedestrian Gates, Clairemont, 91711, 1 of 4, Built and painted by WoodFenceExpert.com
They wanted single cylinder (key operation on the outside only) deadbolts on these gates keyed alike, no problem! Our unique and strong (because I designed and built them) heavy duty wood gates operate and swing as smooth as butter.
Custom Horizontal Wood Fence + Matching Pedestrian Gates, Clairemont, 91711, 2 of 4, Built and painted by WoodFenceExpert.com
The wood 4x4s for the hinge post and the latch post are bolted to 1/4″ thick square steel tube posts, each buried 3 feet deep in concrete (3 x 3 for the latch posts) and (3-1/2 x 3-1/2 for the hinge posts). Plus those heavy duty square steel tube posts are thoroughly cleaned and then painted with heavy duty oil base primer before burial in fresh concrete. Furthermore after the bolting we filled them each with a couple strands of rebar and fresh concrete all the way to the top!! These heavy duty gates are high quality and expensive to build.
Modern Horizontal Wood Fence + Matching Pedestrian Gates, Clairemont, 91711, 3 of 4, Built and painted by WoodFenceExpert.com
So yes, those posts are VERY strong. This is necessary to keep the posts in place and stable to accommodate deadbolt locks that are expected remain in alignment and operate smoothly over time long after we’re done and gone. 1×6 Redwood horizontals with 1/4 inch spacing, this is another project built to last for a very long time.
Modern Horizontal Wood Fence + Matching Pedestrian Gates, Clairemont, 91711, 4 of 4, Built and painted by WoodFenceExpert.com
Here’s a 1×2 modern horizontal front yard wood fence with matching pedestrian gate that we built and stained on the west side of Los Angeles several years ago, in the Mar Vista area. This photo is not as crisp as the rest, apologies. Our straight bottom edge shows the uneven sidewalk a bit. I like how the 2×6 cap stepping down on the side sets it off a bit and gives it a noble look and feel.
Modern Horizontal Wood Fence + Matching Pedestrian Gate in Mar Vista, Los Angeles, Built and stained by WoodFenceExpert.com
It was 2010 or 2011 when we built this project. Out in the semi-rural suburbs with the pleasure of much larger lots and yards, but the expense of much longer modern horizontal wood fences to have built in the Los Angeles area, here I am again a year ago re-staining to renew and preserve this wood fence.
Modern Horizontal Wood Fence in Sun Valley, Los Angeles during a fire 1, Built and stained by WoodFenceExpert.com
Originally the owner and I discussed the design and we created a look and structure to his liking. These photos were taken just a year ago when he had me back to restain and renew the modern horizontal wood fence with the custom steel flashing cap.
Modern Horizontal Wood Fence in Sun Valley, Los Angeles during a fire 2, Built and stained by WoodFenceExpert.com
It was really hot that week here in LA! A fire broke out up the street and grew to a pretty large blaze but only a couple of homes were lost. The owner stayed behind since evacuation wasn’t mandatory, and came down to the roadblock (to keep out looters and lookie-loos) to escort me to the job-site during the days of this restaining project.
Modern Horizontal Wood Fence in Sun Valley, Los Angeles during a fire 3, Built and stained by WoodFenceExpert.com
It was very hot and sunny. There was so much smoke that it acted like cloud-cover and lowered the temperature outside by at least 10 or 15 degrees by blocking out the direct sun. The lowered temperature made it easier to work on this project. Being a cigarette smoker helped me, most of the non-smokers were bothered by the smoke. The smoke didn’t bother me at all.
Modern Horizontal Wood Fence in Sun Valley, Los Angeles during a fire 4, Built and stained by WoodFenceExpert.com
They just let the fire burn and protected the houses and structures and people’s yards. It was a little bit exciting, not too much. A change of pace for sure, there were so many firetrucks in that neighborhood it was ridiculous, all protecting people’s homes, yards and structures. It was a distraction from work also since I took long breaks to hang out and watch the fire with the residents there.
Modern Horizontal Wood Fence in Sun Valley, Los Angeles during a fire 5, Built and stained by WoodFenceExpert.com
Finally I finished the restaining project of the modern horizontal wood fence that I originally built back in 2010 or 2011. It’s still the nicest front yard wood fence on the whole street.
Modern Horizontal Wood Fence in Sun Valley, Los Angeles during a fire 6, Built and stained by WoodFenceExpert.com
This modern horizontal front yard wood fence with a matching pedestrian gate portal that we built and painted in the Los Angeles area also turned out fantabulous. But JEEZ what a tight neighborhood with such small streets, lots and yards! You can see how close the front porch is to the fence and the street.
Modern Horizontal Front Yard Wood Fence + Matching Pedestrian Gate Portal in Los Angeles, 1 or 2, Built and painted by WoodFenceExpert.com
But routinely again it came out great. You can also see where most people park and put out their trash bins on trash day. Way up in the Hollywood Hills, this is up in Laurel Canyon.
Modern Horizontal Front Yard Wood Fence + Matching Pedestrian Gate Portal in Los Angeles, 2 or 2, Built and painted by WoodFenceExpert.com
Here’s another elevated/floating, modern horizontal wood fence in Los Angeles that we built. As is often required I had to design it specifically for this situation.
Modern Horizontal Floating Wood Privacy Fence 1 of 3, Los Angeles 90027
The next door neighbor was an apartment building and that concrete wall {that turned out to have been built with zero foundation and was leaning towards that neighbor (belonged to the neighbor so it could not be trusted to build upon, plus we couldn’t have our build touching it)}, no problem. This customer just wanted a little more privacy for the back yard pool patio from the apartments next door for his family. Taken from the neighbor’s driveway you may be able to see where we slightly notched the bottom of the 4×6 posts so as not to touch the wall. Clear Redwood 1×6 T&G (Tongue & Groove) horizontals, much nicer than that knotty Pine, Douglas Fir, Cypress or whatever the house-flipper used on the similar fence we needed to compliment up above on the other side.
Modern Horizontal Floating Wood Privacy Fence 2 of 3, Los Angeles 90027
Here’s the last photo of this one, taken from this customer’s garage driveway. At the bottom of the photo you can see a little bit of the cheap T&G lumber the house flipper used for the similar fence that they “built”.
Modern Horizontal Floating Wood Privacy Fence 3 of 3, Los Angeles 90027
This project was something new and different, slightly that is. Back in 2008 when I chose the Internet domain name WoodFenceExpert.com, I thought I was so clever. Little did I know or foresee that I would attract the challenging projects which my esteemed competitors would just decline for easier, faster & more profitable projects. Oh well. Here I needed to draw from my expertise & experience to build this modern horizontal wood fence securely upon this pre-existing stone retaining wall. It’s ALL stone and mortar, there is no concrete or block to this wall. And the surface is totally irregular, uneven and rough since it’s a stone & mortar wall.
Modern Horizontal Wood Fence atop Pre-existing Stone Retaining Wall + Matching Gates 1 of 2, Built by WoodFenceExpert.com
No problem, I knew what to do. The build and fastening remains hidden behind the horizontal planks in this photo. And I’m going to keep it this way, hehe. Over the years I’ve put out a lot of wood fence and gates design and construction information, via my photos, videos, etc. I’ve seen copies of my structural styles around town many times, plus I’ve gotten inquiries for help from people all across the country. “How do you do this? What about that?” No problem. But this particular time I’m going to let this one ride as hidden. The main reason for this project was the jumping doggie owned by this customer. They had to keep their dog on a leash in the back yard or it would easily jump the wall and run off. Here you can see one of the matching gates by the back corner of the house, and their jumping dog peacefully and humanely contained and controlled.
Modern Horizontal Wood Fence atop Pre-existing Stone Retaining Wall + Matching Gates 2 of 2, Built by WoodFenceExpert.com
A very short time after this build the owner sent me a video he shot from his phone (while inside the house of course), of a random bear walking on top of the fence and finally jumping off to go explore elsewhere. Notice how the fence does not move, wiggle or wobble when this heavy bear lunges off the fence! Must be a pretty strong and securely built modern horizontal wood fence by yours truly, WoodFenceExpert.com!
Here’s a quick highlight of another project. This modern horizontal wood fence and gates project we built and painted in Beverly Hills, one of the fancier areas of Los Angeles. It came out fantabulous. Here’s a quick video with me from a couple of years ago.
Well let’s do another video shall we? This project in the Mid-City area of Los Angeles had us building and staining a 1×4 modern horizontal Redwood fence and gates “on top of” an existing steel fence and gates. I know everybody likes to say wrought iron, but those days are a hundred years gone now. Wrought iron is solid iron, forged, welded and/or shaped to the craftsman’s and customer’s design specifications. What people erroneously call wrought iron today is just thin-walled square steel tubing, honestly. So it’s accurate name is steel fence. This steel fence and gates were still good enough to build upon (they hadn’t rusted-out yet). Here’s the video, a customer testimonial.
Again, these are just a few highlights of modern horizontal wood fences that we’ve built here in the Los Angeles area. Go to the Photos page of the main website to see many more by clicking HERE.
The classic lines of 1×4 horizontals with 1/2 inch spacing will always be in vogue. No we did not build the tiny garage-shed up at the end. But this modern horizontal wood fence we built and stained on the east side of Los Angeles is 2-sided fence with a regular dog ear vertical plank facade on the other side of the framing. Both neighbors met and discussed this project when I met them originally and during the project. Another fantabulous build!
Modern Horizontal Wood Fence along Driveway in Los Angeles, built and stained by WoodFenceExpert.com
Let’s see some 1×4 horizontals with 1/4″ spacing. We built and stained this about 3 years ago. This set of photos right after our build is BEFORE this customer completely re-landscaped the front yard. It really looks awesome today!!
Front yard modern horizontal wood fence + matching pedestrian gate in Los Angeles, Built and stained by WoodFenceExpert.com #1
Clear Redwood 1×4 horizontals with 1/4 inch spacing, very nice! We built this one a few years ago and stained it with a special, high quality oil-base 2-coat exterior stain & sealer. This is the color they wanted, it’s definitely stunning!
Front yard modern horizontal wood fence + matching pedestrian gate in Los Angeles, Built and stained by WoodFenceExpert.com #2
I’m showing so many photos of this to thoroughly demonstrate how to properly maintain a single height of a wood fence with level horizontals on a hill or slope.
Front yard modern horizontal wood fence + matching pedestrian gate in Los Angeles, Built and stained by WoodFenceExpert.com #3
Our building and staining this modern horizontal wood fence was just the first step of this customer’s total re-landscaping of the front yard.
Front yard modern horizontal wood fence + matching pedestrian gate in Los Angeles, Built and stained by WoodFenceExpert.com #4
Those big concrete foundations got almost completely concealed when they continued with their re-landscaping of the front yard. Now they are invisible, sorry I haven’t stopped to take the photo. But I have driven by and seen it.
Front yard modern horizontal wood fence + matching pedestrian gate in Los Angeles, Built and stained by WoodFenceExpert.com #5
The craftsmanship way is to step or slope the wood fence with level horizontals. Sloping looks more modern and requires a bit more work than stepping on a hill or slope. When you slope such a wood fence you can gradually increase or decrease the height.
Front yard modern horizontal wood fence + matching pedestrian gate in Los Angeles, Built and stained by WoodFenceExpert.com #6
I also wanted to show off the whole project. You can see how perfect the lines are.
Front yard modern horizontal wood fence + matching pedestrian gate in Los Angeles, Built and stained by WoodFenceExpert.com #7
Here’s another set of photos from a project that we built and painted about 2 years ago. This modern horizontal wood fence with matching pedestrian and double-swinger driveway gates is in the Mid-City area of Los Angeles. I waited until AFTER he finished re-landscaping the front yard before I took these photos.
modern horizontal wood fence with matching pedestrian and double-swinger driveway gates in Los Angeles, 1 of 9, built and painted by WoodFenceExpert.com
Rough Redwood 1×4 horizontals with 1/2 inch spacing, painted. Looks pretty nice!! The matching gates are pretty sleek.
modern horizontal wood fence with matching pedestrian and double-swinger driveway gates in Los Angeles, 2 of 9, built and painted by WoodFenceExpert.com
Double-swinger wood driveway gate matching the modern horizontal wood fence, this is easily the nicest front yard fence in the neighborhood!
modern horizontal wood fence with matching pedestrian and double-swinger driveway gates in Los Angeles, 3 of 9, built and painted by WoodFenceExpert.com
He added decomposed granite with the landscaping scheme. I love how it all turned out.
modern horizontal wood fence with matching pedestrian and double-swinger driveway gates in Los Angeles, 4 of 9, built and painted by WoodFenceExpert.com
That wood driveway gate will never sag. Special interlocking diagonal array frame, heavy duty hinges and bolts, super-heavy-duty steel posts, that gate will be sitting and swinging there for a very, very long time!
modern horizontal wood fence with matching pedestrian and double-swinger driveway gates in Los Angeles, 5 of 9, built and painted by WoodFenceExpert.com
Another view of the front yard. I like how the little concrete stepping pads are laid out.
modern horizontal wood fence with matching pedestrian and double-swinger driveway gates in Los Angeles, 6 of 9, built and painted by WoodFenceExpert.com
There are the front porch entry steps on the left.
modern horizontal wood fence with matching pedestrian and double-swinger driveway gates in Los Angeles, 7 of 9, built and painted by WoodFenceExpert.com
That pedestrian gate is over 4 feet wide. Can you see the steel hinge post that the wood 4×4 hinge post is bolted to?
modern horizontal wood fence with matching pedestrian and double-swinger driveway gates in Los Angeles, 8 of 9, built and painted by WoodFenceExpert.com
Finally a view from the other side inside the yard.
modern horizontal wood fence with matching pedestrian and double-swinger driveway gates in Los Angeles, 9 of 9, built and painted by WoodFenceExpert.com
Here’s another! This modern horizontal wood privacy fence with matching pedestrian gate project in Los Angeles that we built and stained has an electric (battery-operated) combination deadbolt that we installed! Clear Redwood 1×6 horizontals look excellent after we hit it with the high quality oil-base exterior stain & sealer that I prefer.
Modern Horizontal Wood Privacy Fence with Matching Pedestrian Gate in Los Angeles 91604, outside view, Built and stained by WoodFenceExpert.com
This customer will be doing the new landscaping later. Can you see the 3 x 3 x 1/4 inch thick square steel posts that the 4×4 hinge post and latch post are bolted to? They are buried 3 feet deep in fresh concrete, and are filled to the top with fresh concrete inside with 2 strands of rebar inside also. WHO else builds with such strong hinge posts and latch posts? Maybe I’m the first. Surely after this long blog article goes live online there will be others.
Modern Horizontal Wood Privacy Fence with Matching Pedestrian Gate in Los Angeles 91604, inside view, Built and stained by WoodFenceExpert.com
Here’s a project where the neighbors shared the cost on this back yard fence and gate project on the west side of town. We built and then painted this back yard modern horizontal wood privacy fence with alternating sections. These two neighbors have kids and dogs so they wanted a gate between their yards.
Back Yard Modern Horizontal Wood Privacy Fence (shared), Alternating Sections with Gate, 90066 1 of 2, Built and Painted by WoodFenceExpert.com
Again I did not think ahead about doing this blog article, by taking photos of the old fence. It was a deteriorated old wood fence falling apart, it was a mess. It’s not a mess any longer! It came out great.
Back Yard Modern Horizontal Wood Privacy Fence (shared), Alternating Sections with Gate, 90066 2 of 2, Built and Painted by WoodFenceExpert.com
Here are some photos of a little front yard project we did a few years ago for a developer that takes older, deteriorated properties, fixes them up and then sells them. This is a small two building apartment complex/property. The fence encloses the front yard and makes it fancy! The second building is in back of this long narrow property.
4′ Tall Sloping Horizontal Front Yard Fence & Pedestrian Gate in Los Angeles #1, Built and Stained by WoodFenceExpert.com
Everybody loved it. It’s a very nice custom, modern horizontal front yard wood fence with matching pedestrian gate project on the east side of town. 1×4 horizontals with 1/4 inch spacing makes an elegant and classic look.
4′ Tall Sloping Horizontal Front Yard Fence & Pedestrian Gate in Los Angeles #2, Built and Stained by WoodFenceExpert.com
Easily the nicest fence in the neighborhood after we finished. Matching pedestrian gate in front to enter the property and front building, it’s a seamless build!
4′ Tall Sloping Horizontal Front Yard Fence & Pedestrian Gate in Los Angeles #3, Built and Stained by WoodFenceExpert.com
The gate operates perfectly.
4′ Tall Sloping Horizontal Front Yard Fence & Pedestrian Gate in Los Angeles #4, Built and Stained by WoodFenceExpert.com
Here’s an inside shot. Our project was step 1 of re-landscaping the front yard, which is usually the case.
4′ Tall Sloping Horizontal Front Yard Fence & Pedestrian Gate in Los Angeles #5, Built and Stained by WoodFenceExpert.com
Yeah the yard was a mess. But today the front yard is beautiful, the owner did an excellent job re-landscaping the front yard after we finished this project and left. The owner also followed my recommendation of having the framing side inside on the lower side of the front yard there.
4′ Tall Sloping Horizontal Front Yard Fence & Pedestrian Gate in Los Angeles #6, Built and Stained by WoodFenceExpert.com
A few years ago a call from Whittier where this customer already had these concrete pillars built, had us build and stain this modern horizontal wood fence in between them. The classic look of 1×4 horizontals with 1/2 inch spacing is almost never inappropriate.
Modern Horizontal Wood fence built upon already existing concrete block pillars in Whittier, Built and Stained by WoodFenceExpert.com
Here’s a before photo. Not very pretty or strong looking. This job was in Irvine over 4 years ago. Irvine is a long commute in the ever-worsening LA traffic, we usually don’t travel that far. But who knows? Maybe these distance jobs will become a larger part of our work. We tore-down, removed and legally disposed of this ugly and deteriorating old wood fence.
OLD FENCE, BEFORE our Modern Horizontal Backyard Wood Privacy Fence with Gate, Irvine, Built and Stained by WoodFenceExpert.com
Here’s the awesome new modern horizontal backyard wood privacy fence and gate, that we built and stained.
Modern Horizontal Backyard Wood Privacy Fence with Gate inside, Irvine, Built and Stained by WoodFenceExpert.com
Irvine is supposed to be one of the safest towns in the country. This is the photo taken from outside this backyard wood fence that is at the rear of this property. This property and fence back up to a public elementary school yard, a big difference from the chain link cage-look of LA public school yards.
Modern Horizontal Backyard Wood Privacy Fence with Gate outside, Irvine, Built and Stained by WoodFenceExpert.com
Here is an example of a type of project that we RARELY do. But in this case it was appropriate to use the existing chain link posts to build a new modern horizontal wood fence and gate upon them. The work and expense necessary to completely remove all of the chain link fence and put in new posts, especially with that tiny wall there would have been too much. We did have to add a post or two on the sides anyway for structural strength. As we are just setting up to get started on the first day, back in 2013 here’s a photo.
Before Modern Horizontal Wood Fence and Gate in Los Angeles, Built and Stained by WoodFenceExpert.com
And yet again it came out fantabulous!
After Modern Horizontal Wood Fence and Gate in Los Angeles, Built and Stained by WoodFenceExpert.com
Chain link fences are put together very fast. Usually I just won’t use the old posts because the project won’t be right. Post spacing, strength and final appearance are the main reasons I won’t. But when it IS doable, there are little framing tricks (construction techniques) to make it work, as we did in this instance. I am not going to show them off to further educate my esteemed competitors, hence the absence of an inside view photo. 1×2 and 1×4 horizontals with a 2×6 cap, photographed to show-off the alignment plus the invisibility of the 2×6 cap when viewed at this particular height!!
Close-up After Modern Horizontal Wood Fence and Gate in Los Angeles, Built and Stained by WoodFenceExpert.com
Here is a modern horizontal wood fence project in the Los Angeles area that was done in phases. It was a big yard, so we returned three more times after this to build the other segments of the back yard perimeter, modern horizontal wood fence and gates project. That makes this first phase (these four photos) a sub-project. This is also an excellent example of a horizontal wood fence on a slope.
Modern Horizontal Wood Fence + Matching Pedestrian Gate, Sierra Madre 91024, 1 of 4, Built by WoodFenceExpert.com
This back yard was getting completely redone. New landscaping, new concrete patio and walkways, awesome new saltwater pool, it was getting completely transformed into something very, very nice and elegant. You can see the new swimming pool in the foreground.
Modern Horizontal Wood Fence + Matching Pedestrian Gate, Sierra Madre 91024, 2 of 4, Built by WoodFenceExpert.com
All of this new modern horizontal wood fence got painted a beautiful and unique light brownish earth-tone color. If I ever go back there I will snap a couple of quick ones to show you and add them here at a later time. This outside view shows the framing side, a give-away for how to frame these horizontal wood fences on a slope for my aspiring, esteemed peers in the industry.
Modern Horizontal Wood Fence + Matching Pedestrian Gate, Sierra Madre 91024, 3 of 4, Built by WoodFenceExpert.com
And here’s the gate at the bottom.
Modern Horizontal Wood Fence + Matching Pedestrian Gate, Sierra Madre 91024, 4 of 4, Built by WoodFenceExpert.com
This modern horizontal wood fence and gate project we built and painted earlier this year (2018) way up in the fancy area of Studio City. We came in after the addition (which we enclosed with this horizontal wood fence and gate) and concrete was all done. These eight photos I rushed through snapping a walk-through-view of the project. From the back end to the front end where the gate ends it, and then out around the outside, you can see our project just BEFORE all the new and elegant landscaping was about to begin.
Modern Horizontal Wood Fence + Pedestrian Gate, 1 of 8, Studio City, 91604; Built and Painted by WoodFenceExpert.com
Privacy with a view, it’s an elegant neighborhood up there. You can see the form is ready down there for the tiny concrete slab, for the garbage bins.
Modern Horizontal Wood Fence + Pedestrian Gate, 2 of 8, Studio City, 91604; Built and Painted by WoodFenceExpert.com
Nice and clean lines everywhere, this was a fun creation.
Modern Horizontal Wood Fence + Pedestrian Gate, 3 of 8, Studio City, 91604; Built and Painted by WoodFenceExpert.com
And here comes that awesome, unique design, strong and stable wood pedestrian gate!
Modern Horizontal Wood Fence + Pedestrian Gate, 4 of 8, Studio City, 91604; Built and Painted by WoodFenceExpert.com
What you cannot see is the thick and very strong square steel tube post behind the 4×4 wood hinge post that is supporting the hinge post with thick heavy duty bolts. You also cannot see the rebar and concrete that we filled the square steel tube post with inside, all the way to the top. We had to cut and jackhammer a hole into the concrete for that heavy duty steel post, to make sure the gate would be held up and right for a very, very long time.
Modern Horizontal Wood Fence + Pedestrian Gate, 5 of 8, Studio City, 91604; Built and Painted by WoodFenceExpert.com
Color coordinated with clean lines everywhere, this came out very, very nice!
Modern Horizontal Wood Fence + Pedestrian Gate, 6 of 8, Studio City, 91604; Built and Painted by WoodFenceExpert.com
Now let’s have a couple of outside views of this modern horizontal wood fence and gate project that we built and painted here in the Los Angeles area.
Modern Horizontal Wood Fence + Pedestrian Gate, 7 of 8, Studio City, 91604; Built and Painted by WoodFenceExpert.com
This is a true example of an elegant, modern horizontal wood privacy fence and pedestrian gate project. The landscaping people were starting the next week after we left. If I ever drive up that street again I will grab a quick photo and add it here later.
Modern Horizontal Wood Fence + Pedestrian Gate, 8 of 8, Studio City, 91604; Built and Painted by WoodFenceExpert.com
I could continue on-and-on with more-and-more project highlights. I will return from time-to-time to add even more Modern Horizontal Wood Fence project highlights from our wood fence projects here in the Los Angeles area.
Visit the main website at WoodFenceExpert.com.
Here’s a new surprise, something completely different but EXCELLENT! Here are my FAVORITE stores for kitchen cookware, gadgets, and other similar high quality tools for the kitchen. You can bring the wife for this trip, uh, oops. It’s 2022 I forgot. You can bring the hubbs, um, either way these are my favorite stores for shopping for the kitchen.
CLICK to go to the Lodge Cast Iron Store on Amazon
CLICK to go to the Fullstar Kitchen Inovation Store on Amazon
CLICK to go to the Misen Better Cooking Tools Store on Amazon
CLICK to go to the Bonsenkitchen Store on Amazon
CLICK to go to the HexClad Hybrid Cookware Store on Amazon
CLICK to go to the DASH Kitchen Goodies Store on Amazon
CLICK to go to the de Buyer Cookware Store on Amazon
CLICK to go to the Hamilton Beach Store on Amazon
CLICK to go to the Zyliss Kitchen Gadgets Cookware and more Store on Amazon
CLICK to go to the finedine Kitchen Cookware and more Store on Amazon
Here’s a look about our latest wood fence project in the Los Angeles area. It came out perfect! It’s a board-on-board style backyard privacy Redwood fence with a heavy duty matching pedestrian gate. The longest span here is shared by, and dividing two neighbors. Plus there’s an adjoining span back there for the neighbor on the left, and another adjoining span up front with a heavy duty matching wood pedestrian gate for the neighbor on the right.
There was an old chain link fence from the back corner up to the concrete slab that was full of vines, overgrowth and finally fiberglass panels to hide the mess for the neighbor on the left (which they inherited when they purchased their home). Then adjoining to that was a very poorly built regular dog ear wood fence with an equally poorly-built wood pedestrian gate coming forward upon the concrete slab, that was unsurprisingly out-of-alignment with the adjoining chain link fence to the rear. Also along the chain link fence on the left side were several bushes that they wanted GONE to allow a future new landscaping project. I apologize for not taking photos before we started, I did not think about doing a blog article about this project then.
We removed everything undesirable as requested and agreed, we did some minor raking to even out the slope/grade for the new wood fence. And we built this awesome new wood fence and matching wood pedestrian gate project that everybody loved!
Board-on-Board-Overlapping-Backyard-Privacy-Redwood-Fence-with-Heavy-Duty-Matching-Pedestrian-Gate-1-of-3, 91107-Built-by-WoodFenceExpert.com
The neighbors on the right also recently purchased their home so they also inherited the mess of an old fence that they shared with the neighbors on the right. Both neighbors decided to split the cost of the wood fence span that they shared, and that made it even more affordable and more desirable for each of them! Both neighbors were very nice and pleasant, as a matter-of-fact, they were so nice that they probably could have had NO fence and would have been happy. But both neighbors have kids and one has a dog so security and privacy needed to be remedied, hence the build we built.
Board-on-Board-Overlapping-Backyard-Privacy-Redwood-Fence-with-Heavy-Duty-Matching-Pedestrian-Gate-2-of-3, 91107-Built-by-WoodFenceExpert.com
In my absence both neighbors met to discuss and agree upon the exact length and front ending-point of the long span that they shared, as well as the final design of the new wood fence. Originally only the neighbor on the left had contacted me about this project. During our meeting the subject of the neighbor on the right came up as they were doing an extensive remodel project at the time and they also had recently purchased their home. In the second photo above you can see a couple of white painted wood scraps on the ground near our new wood fence from the remodel crew. When they learned the advantages of meeting with the neighbor to work out design details and share the cost of the new wood fence it became obvious that it was a win/win situation for everybody, so they said they’d meet with the neighbor on the right whom they’ve already met to discuss the project!
Board-on-Board-Overlapping-Backyard-Privacy-Redwood-Fence-with-Heavy-Duty-Matching-Pedestrian-Gate-3-of-3, 91107-Built-by-WoodFenceExpert.com
Yes it’s a Redwood privacy wood fence but obviously as you can see the posts and framing are pressure treated Douglas Fir. Hopefully the photos are clear enough for you to see the slightly elevated concrete foundations, that are necessary to isolate the posts from soil and moisture to inhibit rot and infestation. Not all wood fence builders know about this or even care, or even inform you about it. Ever wonder why rotten fences usually fail at the base of the posts? Where the posts are surrounded by dirt and usually eaten away by termites, not isolated from the dirt with slightly elevated concrete foundations as we routinely do and as shown here? Sure it’s slightly more expensive, slightly, but it greatly extends the life of the new wood fence!
And take a gander at that 4×6 hinge post for the gate there. What’s with that? Well it’s a custom steel reinforced 4×6 hinge post that we custom fabricate on-site. This one here is buried 3 feet deep in fresh concrete. This is an invention and superior design innovation by yours truly, WoodFenceExpert.com, for you, to have a better finished product. And for us as builders to have greater pride from creating and building it. Here’s a quick video I did a few years ago about it:
Call, text or email me when you’d like a higher quality new wood fence, wood driveway gate, etc.!
Here’s a new surprise, something completely different but EXCELLENT! Here are MY FAVORITE stores for kitchen cookware, gadgets, and other similar high quality tools for the kitchen. You can bring the wife for this trip, uh, oops. It’s 2022 I forgot. You can bring the hubbs, um, either way these are my favorite stores for shopping for the kitchen.
CLICK to go to the Lodge Cast Iron Store on Amazon
CLICK to go to the Fullstar Kitchen Inovation Store on Amazon
CLICK to go to the Misen Better Cooking Tools Store on Amazon
CLICK to go to the Bonsenkitchen Store on Amazon
CLICK to go to the HexClad Hybrid Cookware Store on Amazon
CLICK to go to the DASH Kitchen Goodies Store on Amazon
CLICK to go to the de Buyer Cookware Store on Amazon
CLICK to go to the Hamilton Beach Store on Amazon
CLICK to go to the Zyliss Kitchen Gadgets Cookware and more Store on Amazon
CLICK to go to the finedine Kitchen Cookware and more Store on Amazon
Looking for installation of a wood fence here in the Los Angeles area? We would be happy to do an excellent job building your new wood fence. It’s reasonable that you would want to see some photos of our work, of course. There are hundreds of photos of our work, installations of wood fences in the Los Angeles area that we’ve built, that can be viewed from this page WoodFenceExpert.com/Photos. Near the bottom of the home page of the main website WoodFenceExpert.com. are actually the most complete and up-to-date online portfolios of our work!
Let’s have a photo right now, right here. We built this back in 2009 or 2010! It really turned out nice. The Internet can sometimes be funny or strange. During your search for example this article may get served up by Google or whatever search you’re using. If you’re ready to call, email or text, here’s the main website WoodFenceExpert.com.
You can call my cell, it’s 310-717-2000. My name is Stefan.
Awesome Horizontal Wood Fence Los Angeles, built by WoodFenceExpert.com
Yeah this is a modern horizontal wood fence, we built it and stained it afterward. This is also called wood fence installation of course, and this one was in Pasadena, well within the Los Angeles area. If you’d like to narrow your focus to horizontal wood fence installation, in Los Angeles, then instead of the trouble of following three links back through the menu, let’s just have the link right here! Yep that’s an easy jump. Wood Fences & Gates Modern Horizontal Styles and Designs, in and around Los Angeles, Built by WoodFenceExpert.com.
Wood fence installation in Los Angeles is a search term that many people use on the Internet, but a search term that more accurately describes what we do is actually wood fence building, in Los Angeles and the general LA area. We are Builders, of wood fences to be precise.
It’s time for another photo, let’s have a vertical plank wood fence this time. This one we very recently (2018) “installed”, er-uh actually BUILT to state it most accurately. It was a very fun and satisfying build. Nice customer, new design that they wanted but we never built anything quite like this before. We stained it afterward. It really came out awesome!
Custom Pointed Top Stained Front Yard Wood Fence + Entry Gate Portal, outside view, Los Angeles 90026, Built by WoodFenceExpert.com
And here’s the inside view. You can see the framing, the very strong matching pedestrian entry gate and portal to the outside world. They did not want our ingenious and strong fastening to the solid concrete wall below visible, which was fine. We just covered it up nicely on the inside there.
Custom Pointed Top Stained Front Yard Wood Fence + Entry Gate Portal, inside view, Los Angeles 90026, Built by WoodFenceExpert.com
Want to browse more vertical wood fences that we have, um-er-uh-well “INSTALLED” here in Los Angeles. It’s a city-slicker term, yeah I know. We BUILT all these, on-site as a matter of fact! So here is a link for that Wood Fences and Gates, Regular and Modern Vertical Styles and Designs, in and around Los Angeles, Built by WoodFenceExpert.com.
Let’s jump a little bit and see some of our beautiful and strong wood driveway gates that we’ve, uh-er, installed-actually BUILT here in the Los Angeles area. We also stained this one after we built it.
Custom Horizontal Double-Swinger Wood Driveway Gate + Matching Pedestrian Gate, outside view, El Monte 91732, Built by WoodFenceExpert.com
Large double swinger custom horizontal wood driveway gate plus a matching pedestrian gate to close off the back yard from the front yard! Here’s the inside view! We built this one this year (2018) also.
Custom Horizontal Double-Swinger Wood Driveway Gate + Matching Pedestrian Gate, inside view, El Monte 91732, Built by WoodFenceExpert.com
Let’s see some more installations / builds of these heavy duty wood driveway gates that we’ve BUILT here in the los Angeles area. Los Angeles Area Wood Driveway Gates, Built by WoodFenceExpert.com.
Here in the Los Angeles area it’s a very different and unique market for installing, uh-er, ummm, BUILDING wood fences, gates, etc. Wood fence installation Los Angeles for the robots and machines, just like Spanish-it’s a new language to explore! It ain’t like the new construction tracks of new ‘burbs that we had so much during the 1980’s, at least not here in LA. So a new category of wood fences has come about since here in the Los Angeles area, almost every jobsite has some unique challenge. Let’s see one from this new category right about now. This one we built last year (2017). It also really turned out incredible.
Custom Wood Lattice Floating-Elevated Semi-Privacy Screen, Stained, in Los Angeles, Built by WoodFenceExpert.com
Floating or Elevated Wood Fences is what I call them. In this case there was no way that I would trust that wall to securely hold the fence. This customer was also nice and they preferred a completely lattice fence, no problem! Don’t want to alienate the neighbors and make them feel like you really do not like them, so a semi-private solution was the best way to go. Alright, let’s have a link to photos of these wood fences belonging to this new category, “floating or elevated wood fences” shall we? Floating/Elevated Wood Fences, Etc., in the Los Angeles area, Built by WoodFenceExpert.com.
If you’re ready to call, email or text, here’s the main website WoodFenceExpert.com.
You can call my cell, it’s 310-717-2000. My name is Stefan.
Here’s a new surprise, something completely different but EXCELLENT! Here are MY FAVORITE stores for kitchen cookware, gadgets, and other similar high quality tools for the kitchen. You can bring the wife for this trip, uh, oops. It’s 2022 I forgot. You can bring the hubbs, um, either way these are my favorite stores for shopping for the kitchen.
CLICK to go to the Lodge Cast Iron Store on Amazon
CLICK to go to the Fullstar Kitchen Inovation Store on Amazon
CLICK to go to the Misen Better Cooking Tools Store on Amazon
CLICK to go to the Bonsenkitchen Store on Amazon
CLICK to go to the HexClad Hybrid Cookware Store on Amazon
CLICK to go to the DASH Kitchen Goodies Store on Amazon
CLICK to go to the de Buyer Cookware Store on Amazon
CLICK to go to the Hamilton Beach Store on Amazon
CLICK to go to the Zyliss Kitchen Gadgets Cookware and more Store on Amazon
CLICK to go to the finedine Kitchen Cookware and more Store on Amazon
Should The New Wood Fence Be Stained?
September 4, 2016
Originally published June 28, 2009. Small edits and/or updates of new information now included.
Should the new wood fence be stained? This question can be re-phrased two different ways! First-How long would you like the new wood fence to last? Second-Would you like the new wood fence to be even more beautiful for a longer time?
A wood fence is definitely an investment in, and an improvement to a property. It’s also something you get to look at for many years to come.
Simply applying only one coat of stain will increase the life of the new wood fence. I recommend giving the wood fence a new coat of stain every 3 to 10 years: depending upon various climates & environments, the appearance, and your free time and level of motivation (if you do-it-yourself). Modern stains seem to have been chemically engineered to also function as wood preservatives. And those hungry little bugs that eat fences everywhere certainly don’t like the taste or after-affects of a good, strong oil base stain!
I often use a specially engineered exterior stain & sealer! Even today’s modern exterior paints perform very well over time as long as the application is done correctly. The stain that I favor is supposed to be one of the best outdoor wood stains that money can buy! Many builders and suppliers feel that the brand of stain we use IS the best! Certainly two coats are available if you wish.
Oil-base means solvent based, as in petroleum solvents, of the same class as gasoline, diesel, paint thinner, etc. A good, penetrating toxic oil-base stain is just what you want because it is also toxic to termites! Just don’t go licking the fence while the stain is still wet right after application (the current fads of “no responsibility” and “it’s okay to be stupid, kinda cool, haha” are rendering more and more people into those very same useless categories and mindsets, beware you don’t fall into that trap!
Call me direct on my cell at 310-717-2000 for an in-person estimate for your new wood fence or other outdoor wood project!
Here’s a new surprise, something completely different but EXCELLENT! Here are MY FAVORITE stores for kitchen cookware, gadgets, and other similar high quality tools for the kitchen. You can bring the wife for this trip, uh, oops. It’s 2022 I forgot. You can bring the hubbs, um, either way these are my favorite stores for shopping for the kitchen.
CLICK to go to the Lodge Cast Iron Store on Amazon
CLICK to go to the Fullstar Kitchen Inovation Store on Amazon
CLICK to go to the Misen Better Cooking Tools Store on Amazon
CLICK to go to the Bonsenkitchen Store on Amazon
CLICK to go to the HexClad Hybrid Cookware Store on Amazon
CLICK to go to the DASH Kitchen Goodies Store on Amazon
CLICK to go to the de Buyer Cookware Store on Amazon
CLICK to go to the Hamilton Beach Store on Amazon
CLICK to go to the Zyliss Kitchen Gadgets Cookware and more Store on Amazon
CLICK to go to the finedine Kitchen Cookware and more Store on Amazon
Happy Kitchen Shopping!